Followers

Showing posts with label tutorial. Show all posts

Thursday, June 10, 2010

Burlap Luv...

My fascination with burlap continues...
Today, a tut so so simple that no words are needed...


I heart burlap
and
burlap hearts me!


Friday, February 19, 2010

Lamp shade Tut

Hope you are still interested on knowing how we transformed this lampshade a couple of days ago, because today we are reveling the secret...

  • We printed our design using "Photo Fabric" (paper backed fabric for use in inkjet printers).
JoAnn's fabrics offers 3 different kinds:
Cotton Twill, this is the one we use.
Silk
Canvas


The fabric is very white, to make it match the lampshade better, we chose a background for our design with a yellowish vintage tone.

  • We made a pattern of the side of the lampshade we wanted to embellish. We used paper, but now we realize that using a piece of muslin makes the pattern making a whole lot easier...craft and learn!!


  • Once we were happy with the pattern, we cut the printed fabric, peeled the backing and applied it to the shade using spray adhesive.
Thinking about the possibilities of fabric printing, we also came up with this alternative for when we want to use a specific color or material:

  • Attach a clear sheet of label material for inkjet printers to your fabric. make sure you get rid of wrinkles!
  • Cut the fabric to fit the sheet. Your fabric should be now: 8.5" X 11"
  • Print your design
  • Peel the Label Sheet and use your printed fabric as needed.

Here's the design we made, in case you would like to use it.
(please: personal use only, no commercial)


Are your wheels spinning yet?
Well, what are you waiting for???
Go print something...
Go make something beautiful!!

Monday, February 15, 2010

Inspiration...

We love a good tutorial...

An easy to follow, well written, with tons of pictures tutorial.
Many times, we find ourselves reading project tutorials that we know we will never attempt. Why?
Because good tutorials are like those mandatory Philosophy classes we took in high school: we don't use them every day, but from time to time, they pop up in our heads and make us think...

Jumping from blog to blog...to blog..................to more blogs
we found this cool tutorial by the girls at
Alchemy Junk

Very cool wood clock with the best vintage look ever...
at a fraction of the price of those in fancy catalogs!

These talented girls show it all HERE...
You should visit them, even if you don't need a clock, because their step by step directions to their fantastic paint job will inspire you to paint something...we promise!

Thank you Alchemy Junk for sharing your tips!


Saturday, September 19, 2009

Wake up and...

make the roses!

We received lots of mail yesterday asking for the tutorial of our paper roses so Ladies, grab your latte and follow us to the work table...

We start with a pile of stained coffee filters...we drink instant coffee so we hand stain each filter but you can use the used coffee filters out of your coffee machine...(let them dry and get rid of the coffee first!)

Depending on how full you want your rose to be, you can work with one or two filters at the time.
Fold it in half:

From one end, start wrapping the paper, not too tight...

all the way to the end...

The side from where you are holding your rose, will look like this:

We wrap an easy to twist wire around the end....

and while we watch some T.V...

we play with each petal, shaping them like the real ones ...

Once we have made a few roses, we form our bouquet.
This is a picture of the back...

You can cover the stems with some vintage binding, but we love the contrast between the vintage look of the roses and the silver wire...


Now, if you don't have time to make your own bouquet, you can purchase one HERE.
For $12.00 (including shipping) you get a bouquet of 6 large roses and 2 buds.

Our roses are very easy to use in a bouquet or individually...
You'll get enough roses to decorate your chandelier, like we did in our previous post, make a beautiful indoors wreath or finish up a Fall vignette...


Hope you enjoyed our simple tut and will give it a try!
Hugs,
Marcela & Clara

IF YOU ARE LOOKING FOR A FUN ACTIVITY ON MONDAYS, STOP BY, LINK TO OUR JUNKIN' MONDAY PARTY
AND SHARE YOUR VINTAGE FINDS WITH US!!

Friday, March 13, 2009

It's sunny and we're loving it!!

It's sunny and beautiful today... Yeah!!!!
Just one of those days where we get to do a lot of fun stuff around the house... Clara and Dario are building a planter for the front of their beautiful home. (Dario is building, Clara is managing: she makes the coffee and runs to Lowe's when necessary) and I'm trying to organize my supplies and work in some projects for our Arcade Sale the first week of April...We'll send more info later on, but for now, save the date!...

We wish you all could be there, but we also know that some of you are really far away...sigh...!

Like I told you, I'm organizing my supplies. My ideal would be to have most of them in containers pretty enough to display. I made one already for my buttons, pins and needles and posted more pictures and tutorial in my Etsy Group Blog.


It's fun, inexpensive and easy enough to make with the kids. Hope you will give it a try!!
Have a wonderful, creative weekend full of charm and family inspiration!!


"In time of test, family is best."
~Burmese Proverb~

Thursday, February 5, 2009

TGIF Images and Tutorial

We haven't posted a tutorial in a few weeks so we thought that you ladies will like something easy and cute for Valentine's Day. Just a nice way to present some chocolate to a special someone, like Martha says...It's all in the details..!
Starting with a vintage sheet of ephemera, we used a 8 1/2" X 12" sheet of music, you could also use vintage wall paper, vintage magazine pages or even vintage newspaper...reuse and recycle!Roll it in a cone shape. Fold the bottom of your cone, about 2 inches up. One dot of glue will hold it in place.


Cut 24" of a pretty ribbon and using your glue gun, attach it to the back of your cone. (make sure the cone is centered) and tie it on the front on a bow, flattening your cone some and making it look more as an envelope. (The bow will look better if it's a little off-center...)

You can use this week's free images to make the card. We mounted the "I love you Puppy" to two coordinating papers and added a touch of german glitter to the edges. Glue it to the front, next to the bow.


Tissue paper and the Recipient's favorite chocolate make the best filler!


And finally, here are the two TGIF images, digitally made by us and free for you to use them on your favorite craft. Enjoy!


"Gravitation is not responsible for people falling in love. "~Albert Einstein~


Even Einstein had a romantic side!!!

Monday, December 22, 2008

Christmas with a Chinese twist!

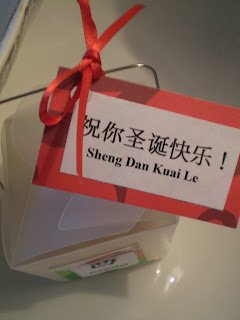
If you follow our blog you know that I have been patiently waiting to see Clara's 2008 Christmas Dinner place cards, and to my surprise, we (you, the reader and I) don't have to wait until Christmas Eve, she allowed me to take pictures and blog about them, Yes! ....let me explain first that she made these cuties inspired in our upcoming and very exciting trip to China...Here they are: Clara's Fortune Boxes:


She used clear 2" tall Chinese boxes, (Michael's) half filled with uncooked rice to add weight and keep them in place and a Fortune Cookie.


Clara decorated the front of the box with pretty red and green papers, the Chinese symbol of the guest's Chinese zodiac and the English translation, in this case, Rooster. I love this idea because having this instead of the guest name, becomes an instant conversation piece, a total ice breaker...not that we need one in our family: as typical Argentinians, we all talk at the same time and at the same volume.... (yes, loud)
A red satin ribbon in a delicate bow and a little card reading Shen Dan Kuai Le (Merry Christmas in Chinese) finish her adorable creation.


Remember this project if you are having friends over for Chinese food. Keep in mind that even something simple and casual can become a memorable night...like Martha says, it's all in the details: dedicate a couple of hours to make Clara's Fortune Boxes, get rid of the take out containers, lit a couple of candles and you got yourself a magical night!

You can find the complete list of the Chinese zodiac at this site and the Chinese translation to any phrase: Happy Birthday, Love you, Have a good trip....etc here.

On Christmas Eve I'll bring home my own Fortune Box, it will remind me of my Sister's creativity and dedication to our family, it will remind me of another magical Christmas, a night when we loudly love each person in the room and silently miss those far, far away....

Monday, December 8, 2008

Place Cards Tutorial

When thinking of magical Childhood Christmas, Clara and I always remember the ones spent in Argentina, during hot summer nights, around a very long table full of aunts, uncles and cousins. The dinner table was always the center of the celebration, lots and lots of food kept the family entertained until midnight, time when every year Santa showed up (yes, we had a real Santa)carrying very small but memorable gifts. Those memories move us every year to set a beautiful table, a table for the 9 of us to gather around, laugh and wait anxiously until midnight!

It's on the table that we find the first gift of the night, a small token of handmade love used as a place card and meant to be trasured forever....

These are the beautiful, nostalgic ornaments that Clara made in 2007 (she will not show me yet what she's doing for this year!) for each guest and that ,of course, I'm displaying in my Christmas tree.
She used black and white copies of old protographs of each guest mounted on festive papers and cardstock and glammed with a clear glitter. With a metallic marker she wrote the year, added a ribbon to hang it from and finished them with a touching Christmas thought on the back:

"The best of all gifts around any Christmas tree: the presence of a happy family all wrapped up in each other."


She picked baby blue and silver for the boys and shabby pink and taupe for the girls....This is my now 17 year old when he was only one...


And this is my sweet 14 year old when she was just a baby...

Since I can't remember what I did last year, I guess it wasn't memorable enough, I'm sharing how to make the place cards I'm using for our 2008 Christmas Day Lunch. You will need:


Floral Wire (22 gauge), Wooden star (Michael's $0.25 each), Glitter, Monogram stickers, Crepe Paper, Glue, Glue gun, Cardstock, Small pliers

I start by cutting the wire in an approx. 13" piece. I wrap it around my glue container (it's just the perfect size) working the wire in a base, the rest of the wire is then wraped around a pencil and the end is finished in a little curl using small pliers.


I cover the star in german silver glitter, leaving the center clean of it.


I add crepe paper ruffle to a 1" cardstock circle. Trim the crepe paper and add the Monogram sticker with the initial of each guest.


I glue it to the center of the star.

And then I glue the star, using a glue gun, to the curl on the wire top. Once dried, you might have to play with the wire until your star is in perfect balance to stand all by itself.


Voila!! I'm making them a few weeks ahead because I like the tarnish look they get with time...I promise that I'll post Clara's as soon as she lets me...I know it will be fab...I'm the older Sister, I taught her everything she knows!!!...just kidding!....LOL


"Big sisters are the crab grass in the lawn of life."


~Charles M. Schulz~